I have just started painting a unit of French Napoleonic Carabiniers by the Perry Twins.
Here is the most difficult horse, the trumpeters grey.
How does it look?
Right?
Or Left?
I hope I can paint the riders to the same standard!
Some insights into a crazy world of model soldiers, toys to some, a business to others, an amazing realm where there are no limits other than your imagination, tempered with a bit of research and history.
Followers
Sunday, 23 November 2014
Friday, 21 November 2014
15mm ACW collection
This is my recently deceased best friends 15mm ACW collection.
It is a massive collection, over 500 bases.
Here is a rough list.
It is a massive collection, over 500 bases.
Here is a rough list.
168 Confederate infantry bases (3 figs) (21 x 8 base units)
8 Confederate mounted cavalry (2 figs) (1 x 8 base unit)
20 Confederate dismounted cavalry (2 figs)
33 Confederate mounted cavalry (loose figures)
14 Confederate dismounted cavalry (2 figs) 1 x 8, 1 x 6 base units)
2 Confederate horse holders (3 figs)
8 Confederate guns and crew (4 crew)
4 Confederate 2 horse limbers
9 Confederate mounted commanders
2 Confederate staff groups (2 figs)
54 Union infantry bases (3 figs) (9 x 6 base units)
86 Union infantry bases (3 figs) (several 5-6 base units)
18 Union guns and crew (2-4 crew)
4 Union guns and crew (3/4 crew)
3 USA or CSA 4 horse wagons
6 USA or CSA 4 horse limbers
2 Union 2 horse limbers
4 Union 2 horse teams
12 Union mounted cavalry (2 figs)
12 Union mounted cavalry (2 figs) (2 x 6 base units)
12 Union dismounted cavalry (2 figs) (2 x 6 base units)
3 Union dismounted cavalry (2 figs)
18 Union mounted commanders
3 Union foot officers (1 fig)
The units and bases are made and labelled with On To Richmond in mind but will fit many other rulesets.
I had hoped to use them with a few of the guys in some big games in memory of my chum. I don't think that will happen now. I have decided that I will put them up for sale, hopefully through one of my usual contacts, perhaps as a complete collection, perhaps as separate brigades. I may even go as far as eBay.
If anyone is interested then please let me know.
Tuesday, 11 November 2014
A Ruined Church - Refurbished
Regular readers will remember the Ruined Ruined Church.
It looked like this.
I based it on a square of thin cardboard and then glued that card onto a slightly larger thicker piece with a square cutout in the centre.
This stops the building pirouetting on a high spot should the base warp a little.
The walls joined together poorly with big gaps here and there.
I filled the deepest parts of the gap with Milliput.
Later I filled the gap flush to the wall and then incised a stone pattern which blended with the original wall. Once it was painted you could hardly see the join.
I covered the floor with thin squares of cardboard and gave them a wash of plaster, just enough to fill the gaps bit and leave a bit of edge definition. I also added another ruined wall carved from blue insulation foam as well as some rubble heaps and dislodged masonry.
I added some partial roofing timbers made with strips of balsa wood and a few tiles from the tiling sheets marketed by Warbases.
I base painted all the major surfaces using acrylic paint. I also added a few patches of sand glued down with PVA.
I then highlighted various areas by dry-brushing here and there using a variety of colours.
I then made a tree with twisted copper wire, some cut up pot scourer and some masking tape.
I then bent the roots to fit its intended location on the church base,
I added a couple of knocked-in doors from balsa sheet.
I flocked the tree and glued it into place.
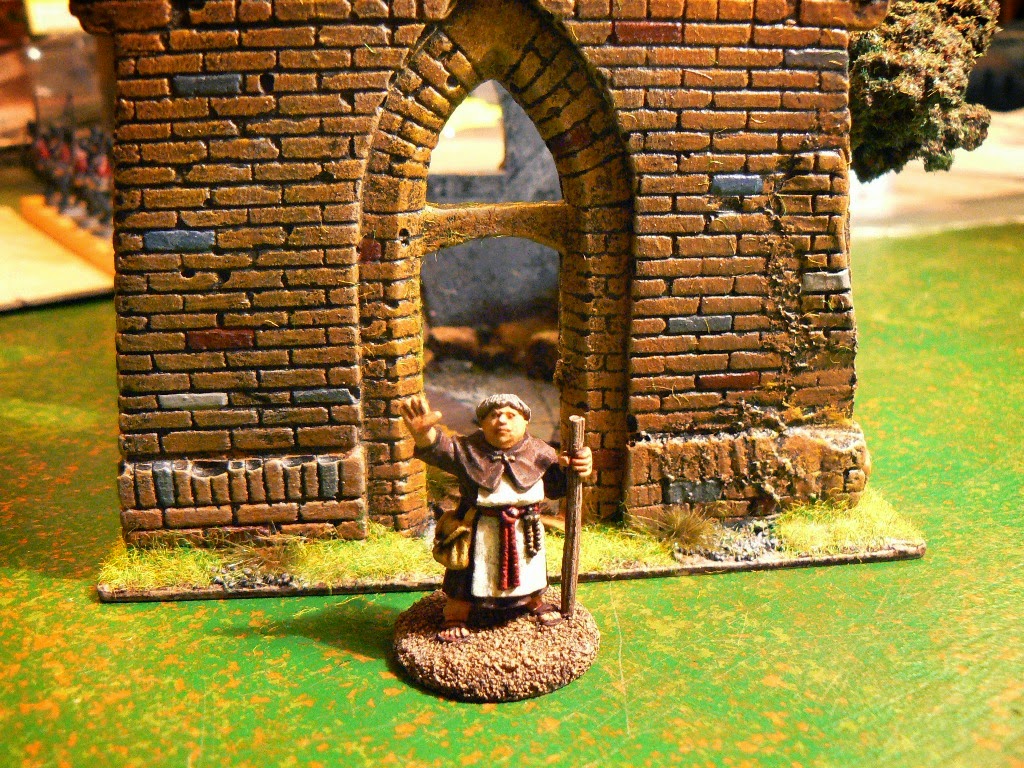
A local monk came along to investigate the refurbishment. If he's looking for a fuller restoration then he'll have to pray to a higher power than I.
Farewell Brother!
It looked like this.
I based it on a square of thin cardboard and then glued that card onto a slightly larger thicker piece with a square cutout in the centre.
This stops the building pirouetting on a high spot should the base warp a little.
The walls joined together poorly with big gaps here and there.
I filled the deepest parts of the gap with Milliput.
Later I filled the gap flush to the wall and then incised a stone pattern which blended with the original wall. Once it was painted you could hardly see the join.
I covered the floor with thin squares of cardboard and gave them a wash of plaster, just enough to fill the gaps bit and leave a bit of edge definition. I also added another ruined wall carved from blue insulation foam as well as some rubble heaps and dislodged masonry.
I added some partial roofing timbers made with strips of balsa wood and a few tiles from the tiling sheets marketed by Warbases.
I base painted all the major surfaces using acrylic paint. I also added a few patches of sand glued down with PVA.
I then highlighted various areas by dry-brushing here and there using a variety of colours.
I then made a tree with twisted copper wire, some cut up pot scourer and some masking tape.
I then bent the roots to fit its intended location on the church base,
I added a couple of knocked-in doors from balsa sheet.
I flocked the tree and glued it into place.
A local monk came along to investigate the refurbishment. If he's looking for a fuller restoration then he'll have to pray to a higher power than I.
Farewell Brother!
Saturday, 8 November 2014
Purchases at Targe
I paid a visit today at the Targe wargames show in Kirriemuir.
Targe is a lovely small show, a 90 minute drive north of Edinburgh. I was there mainly to sell more of my recently deceased (actually a year now) friends wargaming collection to further raise a charitable donation to Combat Stress in his name.
http://kirriemuirwargames.co.uk/targe-2013/
I also made a substantial early payment to Combat Stress to the tune of £4000 which was gratefully received on their behalf by Charles Stewart Grant. Charles is another wargamer, you may have heard of him. I have some way to go with the remainder of the collection.
http://www.combatstress.org.uk/
My bonus points consisted of a few purchases.
Another single arch bridge by Warbases.
So nice I got a two arch bridge.
And went the whole hog and got a three arch bridge as well.
While I was at it I got a Hay Cart complete with hay load and carthorse.
http://war-bases.co.uk/
Keep following this blog for their construction.
I also got a spray can of matt varnish from Erik at Figures in Comfort. He tells me it is good. I don't believe him so I'll just have to test it out.
http://www.figuresincomfort.net/
I also snapped up a mint copy of this book for a fiver from Graham Robertson Books.
And finally could the chap who left these figures contact me and I'll make arrangements to return them.
Progress is being made with the Ruined Ruined Church and a freebie sprue of 28mm Napoleonics.
Watch this space.
Targe is a lovely small show, a 90 minute drive north of Edinburgh. I was there mainly to sell more of my recently deceased (actually a year now) friends wargaming collection to further raise a charitable donation to Combat Stress in his name.
http://kirriemuirwargames.co.uk/targe-2013/
I also made a substantial early payment to Combat Stress to the tune of £4000 which was gratefully received on their behalf by Charles Stewart Grant. Charles is another wargamer, you may have heard of him. I have some way to go with the remainder of the collection.
http://www.combatstress.org.uk/
My bonus points consisted of a few purchases.
Another single arch bridge by Warbases.
So nice I got a two arch bridge.
And went the whole hog and got a three arch bridge as well.
While I was at it I got a Hay Cart complete with hay load and carthorse.
http://war-bases.co.uk/
Keep following this blog for their construction.
I also got a spray can of matt varnish from Erik at Figures in Comfort. He tells me it is good. I don't believe him so I'll just have to test it out.
http://www.figuresincomfort.net/
I also snapped up a mint copy of this book for a fiver from Graham Robertson Books.
And finally could the chap who left these figures contact me and I'll make arrangements to return them.
Progress is being made with the Ruined Ruined Church and a freebie sprue of 28mm Napoleonics.
Watch this space.
Thursday, 30 October 2014
Am Off to Crisis 2014 in the Morning
Just a last quick blog entry before I try and get a few hours sleep before setting off towards Antwerp for their annual wargames show CRISIS.
http://www.tsoa.be/crisis_general.html
I'll be flying out Edinburgh International at 6 am so I expect to be exhausted before I get there.
Here's the queue from last year. I hope it will be drier this year.
My club, SESWC, put on a pre-release demonstration of THE RAIDERS which was a supplement to the popular DUX BRITTANIARUM by the Two Fat Lardies.
Here are the 'untamed wild men' ...
Oops, sorry, here are the 'untamed wild men' ...
This small table was the scene of many a cattle raid amidst a swishing of kilts (or maybe it was the broadswords swishing).
I had a look around the show for some TRAINS (but only found the tracks);
And BOATS;
And PLANES;
All in all, Crisis is a great show, you really need to be there to appreciate it, the TSA guys would like you to be there.
http://www.tsoa.be/crisis_general.html
I'll be flying out Edinburgh International at 6 am so I expect to be exhausted before I get there.
Here's the queue from last year. I hope it will be drier this year.
My club, SESWC, put on a pre-release demonstration of THE RAIDERS which was a supplement to the popular DUX BRITTANIARUM by the Two Fat Lardies.
Here are the 'untamed wild men' ...
Oops, sorry, here are the 'untamed wild men' ...
This small table was the scene of many a cattle raid amidst a swishing of kilts (or maybe it was the broadswords swishing).
I had a look around the show for some TRAINS (but only found the tracks);
And BOATS;
And PLANES;
All in all, Crisis is a great show, you really need to be there to appreciate it, the TSA guys would like you to be there.
Wednesday, 22 October 2014
A Ruined Ruined Church
I picked up a joblot of bits and pieces the other day. There was a Ruined Church in amongst it and I thought it would be an easy job to tart it up and make it presentable. (I was feeling optimistic at the time).
Here, have look, it's got potential hasn't it?
The pieces were made of a material not unlike Plaster of Paris. It was a bit crumbly and dusty so I gave it a coat (actually three) of acrylic varnish to seal the surface.
Look more closely at the brickwork. You can see where a previous owner has destroyed the brick pattern and has perhaps tried to cover it up with flock. I have scraped away the flock, which was bio-degrading and patched up the bricks with a veneer of Milliput.* Even then I have squished it a bit inadvertently, I'll fix that later.
This is a bad join, quite wide, and has been filed at an angle in its history. I have pinned this joint too, you can see the glue, a mixture of impact adhesive and super glue gel. I added a wedge of milliput through which one of the pins passes. I'll fill the gap later with more Milliput and add brickwork detail.
This angled shot shows the increasing width of the gap. I think the previous owner was a dab hand with a file but knew nothing about right angles and perpendicular and all that.
This arched window is a bit peculiar on the inside, I may do something about that.
The end wall is pretty well clear of paint, has it been stripped I wonder? The stonework pattern is fairly irregular but maybe that will add character to the church once it is finished.
Now, to finish on a positive note: here is the Warbases bridge mentioned in my last post. I have textured the roadway, painted it and added a few tufts.
What do you think?
* Milliput is a two part epoxy putty and is available world-wide.
http://www.milliput.com/
Here, have look, it's got potential hasn't it?
The pieces were made of a material not unlike Plaster of Paris. It was a bit crumbly and dusty so I gave it a coat (actually three) of acrylic varnish to seal the surface.
Look more closely at the brickwork. You can see where a previous owner has destroyed the brick pattern and has perhaps tried to cover it up with flock. I have scraped away the flock, which was bio-degrading and patched up the bricks with a veneer of Milliput.* Even then I have squished it a bit inadvertently, I'll fix that later.
The building came in three parts and I had to pin and glue them as I thought that the joins would be stronger that way. The joining surfaces did not meet very well so I filled the residual gaps with more Milliput.This is a bad join, quite wide, and has been filed at an angle in its history. I have pinned this joint too, you can see the glue, a mixture of impact adhesive and super glue gel. I added a wedge of milliput through which one of the pins passes. I'll fill the gap later with more Milliput and add brickwork detail.
This angled shot shows the increasing width of the gap. I think the previous owner was a dab hand with a file but knew nothing about right angles and perpendicular and all that.
This arched window is a bit peculiar on the inside, I may do something about that.
The end wall is pretty well clear of paint, has it been stripped I wonder? The stonework pattern is fairly irregular but maybe that will add character to the church once it is finished.
Now, to finish on a positive note: here is the Warbases bridge mentioned in my last post. I have textured the roadway, painted it and added a few tufts.
What do you think?
* Milliput is a two part epoxy putty and is available world-wide.
http://www.milliput.com/
Subscribe to:
Posts (Atom)